
Hair Goals for 2014
Overall 2013 was a pretty good 'hair' year. I finally creeped past Shoulder length,
and managed to make Full SL as well. My immediate goal is to be as close to Armpit Length if possible by May. That will be my victory for the moment and I will deal with
fulfilling BSL as the year continues.
For 2014,
1)I want to maintain the current health and thickness of my hair. (Healthy hair from root to tip!)
2) Remain a complete DIY-er as it comes to my hair. i.e. NO hair salon visits in 2014!
3)Continue to switch it up with different hairstyles such as twists outs, braidouts buns, box braids etc.
4)Really baby my ends, I believe I touched on this before, that I will
be paying closer attention to them now that my hair is GROWING longer. One way I
intend to do this is by pre-pooing my ends with oil and honey on washdays.
5)Avoid heat completely and stick to air drying
6)And finally, my biggest goal is to make it to Bra Strap length by December
2014! at the moment i am approximately 5 inches away. If I stick to my regimen
I'm pretty confident that I'll make this goal.
So that's it for me, what are your hair goals for 2014?
HAPPY NEW YEAR
Curly Eva...xxxx
What's the catch with Glycerin?
Hiya!
So I hear so many people talk about Glycerin, but what is it? What does it do? How does it help? Let's try to answer some of those questions.
What is Glycerin?
Glycerin is also known as Glycerol and is a colorless, odorless, viscous liquid. It is used in hair care products by providing lubrication and as a humectant. (A humectant is a a chemical that helps products retain moisture) Glycerin can absorb moisture from the air and has antiseptic qualities
What does Glycerin do?
Glycerin absorbs water from the surround environment. The environment is usually the air but can be your hair and skin if the air is particularly dry.
How does it help?
It will help maintain your hair and scalps moisture levels by drawing moisture into the hair and will help to prevent the frizz of dry hair.
How to utilize it in your routine?
Pour a few drops in your products to up the moisturizing benefits of the product. I add it to my shampoo, which I have noticed affects the shampoo's ability to lather, and different leave in conditioners and my daily spritz.
DIY Recipe

I will be using this spritz
twice a week
- 3-4 parts water
- 2 parts aloe vera juice
- 2 parts glycerin
- 1 part coconut oil
- 1 part olive oil
- few drops essential oil (your favorite)
Heya
How you all doing? Hope you all excited to get into the second last month of the year, with the Festive holidays around the corner and the year coming to an end have we managed to get to our hair goals? , committed to our regimens, challenges and length retention. well here are some recipes to help you get along on your hair journey as they have really helped me too. Try them ot you wont regret it.
Pre-Shampoo Treatment for Shedding Hair
This recipe has the stimulating effects of peppermint oil and the protein benefits of egg. Do this as a quick pre-poo before shampooing and you will find that your hair feels so much better after the wash. You can follow up this treatment with a regular shampoo and then a deep conditioner. Consistent pre-pooing can decrease hair breakage significantly.Pre-Shampoo Treatment for Shedding Hair
Ingredients:
3-4 Drops Peppermint oil
1 teaspoon of olive oil
1 teaspoon castor oil
2 egg yolks
Directions:
Beat the egg yolks until frothy and then add the oils in a small bowl. Massage mixture into hair and scalp. Cover hair with shower cap for an hour. Rinse out then shampoo.
Thin Edges Honey Pre-Shampoo Recipe
My hair edges were extremely thin, they were thin when they were natural because of the hair styles that I used to frequently subject my hair to and they were thin when I relaxed my hair because of the constant relaxing of already relaxed edges. My hair edges keep bouncing back with this formula and I take extra care to do it at least once per month paying close attention to my hair edge.Thin Edges Honey Pre-Shampoo Recipe
Ingredients:
1 tsp honey
2 tsp olive oil
2 tsp castor oil
1 egg yolk.
Directions:
Mix all ingredients in small bowl. Massage on hair edges. Wrap head with shower cap for 30 minutes. Rinse and shampoo. Use leftovers for hair ends.
Coconut and Yogurt Conditioner For Transitioning Hair
This combination of yogurt and coconut will have your whole hair feeling extra special. Coconut and yogurt together has proven to be quite effective in hair care. Some persons even claim that a combination of these two will relax the curl pattern in your natural hair. I have tried it and I have seen no discernible relaxing of my natural curls. However, it does make your hair feel really good. You may be surprised.Ingredients
4 tsp coconut oil
1/2 cup coconut cream
1/2 cup plain unflavored whole yogurt
1 tsp lime or lemon juice
Directions:
Mix coconut oil, coconut cream, yogurt and lime or lemon juice together. Apply to wet shampooed hair. Leave in for fifteen to twenty minutes under a plastic cap. Wrap an old t-shirt or cotton material around the plastic cap to trap heat and allow mixture to sit on hair. Wash out thoroughly after you remove the plastic cap and style as usual.
Ingredients Benefits:
Coconut Oil- Coconut oil keeps protein loss at a minimum because of its close association with hair proteins. The oil enables efficient penetration inside the hair shaft and it is anti-microbial which assists in giving your hair full body and radiance.
Coconut Cream- Coconut cream can be made by simmering 1 part shredded coconut with one part water or milk until frothy, after straining the mixture through a cloth the resultant mixture when allowed to cool and set will separate, the thick non-liquid part is coconut cream. This cream is beneficial to hair in several ways; it is an excellent conditioner and helps in the re-growth of damaged hair. It also provides the essential proteins required for nourishing damaged hair.
Yogurt-Yogurt promotes hair growth, and makes hair easier to comb, an added bonus is that it gets rid of knots. It can also prevent frizzy hair.
Basic Homemade Leave In Conditioner and Hair Moisturizer
Ingredients:
½ cup vegetable glycerin
2 cups water
½ cup moisturizing conditioner (choose your favorite)
4 drops of your favorite essential oil (optional)
Method:
Mix together all the ingredients in a spray bottle. Spray as often as
hair needs to be refreshed. This recipe works very well if you want to
do curly hairstyles. Seal after moisturizing with your favorite carrier
oil (castor oil, coconut oil, olive oil, jojoba oil).
Please note that I have not added any oils to this basic mixture. I
find that my hair does better with the moisturizing then sealing
sequence, instead of adding it to the basic mixture. This is a personal
preference. Some persons add their favorite carrier oils to the basic
moisturizing mixture and it works just fine for them.
Homemade Moisturizer
When I first tried this I borrowed the recipe from the back of a commercial preparation and then tweaked it to suit my hair. My hair loved it. Please note that vegetable glycerin is used somewhat sparingly, too much and the recipe can get sticky.
Ingredients:
1 Tbsp vegetable glycerin
1 ½ cup filtered water
3 tsp. lavender oil
5 drops rosemary oil
5 drops vitamin E oil
Method:
Put all ingredients in a spray bottle and shake together. Spray on hair daily or as needed. You can seal with your favourite carrier oil after (coconut, olive, castor, almond, jojoba). This mixture can last up to three weeks.
Ingredients Benefits:
Water- a natural moisturizer adds elasticity to hair.
Vegetable Glycerin- glycerin is made from fat both animal fat and vegetable fat. Vegetable glycerin is the best glycerin to use for hair products. Synthetic glycerine contains harmful properties. Glycerin or glycerol is hygroscopic; this means it draws water from its surroundings. When combined with water, glycerin will moisturize your hair very well. Vegetable glycerin loves water, the suggestion is to dilute at a minimum of 1 part glycerin with 2 parts water. You can mix vegetable glycerin with anything you want to be more moisturizing.
Using The Green House Effect (GHE) For Longer Hair
By Curly Eva
I want to focus on the Green House
Effect (GHE.) first then try the Baggying method next week. Though these two
techniques are very similar, their goal of achieving longer hair is based on
two different ideals.
I have tried the baggy method
before, but not religiously. So I would like to do both techniques within a
week of each other to compare the results. Even though lots of people with long
healthy hair claim great success with this method, something about sleeping
with plastic on my head all night seems rather unappealing to me. However, the
numbers of women attributing their hair growth to this method can’t be ignored.
Try it out and see what you think.
The Green House Effect (GHE) – The ideal is to create a steam effect (GHE) on the scalp and
hair. When combined with a stimulating oil mixture rubbed onto the scalp, the
steam effect should help stimulate your follicles to produce at a faster pace
than normal resulting in longer hair. The steam also helps moisturize your
hair, preventing dryness and breakage.
The key to this method is the
application of an oil mixture to the scalp. The mixture should ideally contain
ingredients that stimulate blood flow to the scalp without containing butters
or oils that are heavy enough to suffocate the scalp. The essential oils of
rosemary, basil and peppermint are often used for their stimulating properties.
To Do The GHE:
- Apply a stimulating mix to your scalp and rub it in thoroughly, giving yourself a nice scalp massage. This gets blood flowing to your scalp and stimulates growth.
- Apply moisture to the ends of your hair using the oil or butter of your choice. Take this time to also prep your hair for bed by doing twist, braids, or ponytails.
- Wrap hair in layers of plastic. Saran wrap and plastic shower caps work best.
- Add a scarf or bonnet on top of the plastic. Add an additional wool layer like a hat or beenie on top of that, which will help trap even more heat. Remember, the more steam you trap in, the better.
- For sleep, you can remove the hat or beenie and sleep in just the plastic layers and scarf.
- In the morning, shower before removing the scarf and plastic layers. Leave hair alone for 10 minutes to dry. Style as usual.
What’s the difference between GHE
and Baggying?
The main focus of GHE is the
scalp. The aim is to achieve longer hair by stimulating the scalp to grow at an
above normal rate. This is achieved by massaging a stimulating mixture onto the
scalp and covering hair with plastic for long periods of time (like overnight.)
The aim of the Baggy method
is to achieve longer hair by retaining moisture and length. This is done by
focusing on the ends of your hair which are the oldest, most fragile, and most
likely to break. To do this method, simply apply moisture to the ends of hair
(optional) and cover for an hour or more.
Have you tried GHE and did it work
for you?. Have you tried the baggying method how did it go? Let us know your
experience with it.
Curly Eva ......xxx
Using The Green House Effect (GHE) For Longer Hair
By Hollis

I have tried the baggy method before, but not the GHE. Even though lots of people with natural hair claim great success with this method, something about sleeping with plastic on my head all night seems rather unappealing to me. However, the numbers of women attributing their hair growth to this method can’t be ignored. Check it out and see what you think.
The Green House Effect (GHE) – The ideal is to create a steam effect (GHE) on the scalp and hair. When combined with a stimulating oil mixture rubbed onto the scalp, the steam effect should help stimulate your follicles to produce at a faster pace than normal resulting in longer hair. The steam also helps moisturize your hair, preventing dryness and breakage.
The key to this method is the application of an oil mixture to the scalp. The mixture should ideally contain ingredients that stimulate blood flow to the scalp without containing butters or oils that are heavy enough to suffocate the scalp. The essential oils of rosemary, basil and peppermint are often used for their stimulating properties.
To Do The GHE:
- Apply a stimulating mix to your scalp and rub it in thoroughly, giving yourself a nice scalp massage. This gets blood flowing to your scalp and stimulates growth.
- Apply moisture to the ends of your hair using the oil or butter of your choice. Take this time to also prep your hair for bed by doing twist, braids, or ponytails.
- Wrap hair in layers of plastic. Saran wrap and plastic shower caps work best.
- Add a scarf or bonnet on top of the plastic. Add an additional wool layer like a hat or beenie on top of that, which will help trap even more heat. Remember, the more steam you trap in, the better.
- For sleep, you can remove the hat or beenie and sleep in just the plastic layers and scarf.
- In the morning, shower before removing the scarf and plastic layers. Leave hair alone for 10 minutes to dry. Style as usual.
The main focus of GHE is the scalp. The aim is to achieve longer hair by stimulating the scalp to grow at an above normal rate. This is achieved by massaging a stimulating mixture onto the scalp and covering hair with plastic for long periods of time (like overnight.)
The aim of the Baggy method is to achieve longer hair by retaining moisture and length. This is done by focusing on the ends of your hair which are the oldest, most fragile, and most likely to break. To do this method, simply apply moisture to the ends of hair (optional) and cover for an hour or more.
I have to be honest, I’m a little skeptical of the whole GHE thing. I mean, doesn’t your scalp need to breathe? Isn’t it uncomfortable to sleep in plastic? Does adding oil to your scalp and covering it overnight clog your pores? I dunno, I’m obviously not seeing the light here. Have you tried GHE and did it work for you? Let us know your experience with it.
Using The Green House Effect (GHE) For Longer Hair
By Hollis
I have tried the baggy method before, but not the GHE. Even though lots of people with natural hair claim great success with this method, something about sleeping with plastic on my head all night seems rather unappealing to me. However, the numbers of women attributing their hair growth to this method can’t be ignored. Check it out and see what you think.
The Green House Effect (GHE) – The ideal is to create a steam effect (GHE) on the scalp and hair. When combined with a stimulating oil mixture rubbed onto the scalp, the steam effect should help stimulate your follicles to produce at a faster pace than normal resulting in longer hair. The steam also helps moisturize your hair, preventing dryness and breakage.
The key to this method is the application of an oil mixture to the scalp. The mixture should ideally contain ingredients that stimulate blood flow to the scalp without containing butters or oils that are heavy enough to suffocate the scalp. The essential oils of rosemary, basil and peppermint are often used for their stimulating properties.
To Do The GHE:
- Apply a stimulating mix to your scalp and rub it in thoroughly, giving yourself a nice scalp massage. This gets blood flowing to your scalp and stimulates growth.
- Apply moisture to the ends of your hair using the oil or butter of your choice. Take this time to also prep your hair for bed by doing twist, braids, or ponytails.
- Wrap hair in layers of plastic. Saran wrap and plastic shower caps work best.
- Add a scarf or bonnet on top of the plastic. Add an additional wool layer like a hat or beenie on top of that, which will help trap even more heat. Remember, the more steam you trap in, the better.
- For sleep, you can remove the hat or beenie and sleep in just the plastic layers and scarf.
- In the morning, shower before removing the scarf and plastic layers. Leave hair alone for 10 minutes to dry. Style as usual.
The main focus of GHE is the scalp. The aim is to achieve longer hair by stimulating the scalp to grow at an above normal rate. This is achieved by massaging a stimulating mixture onto the scalp and covering hair with plastic for long periods of time (like overnight.)
The aim of the Baggy method is to achieve longer hair by retaining moisture and length. This is done by focusing on the ends of your hair which are the oldest, most fragile, and most likely to break. To do this method, simply apply moisture to the ends of hair (optional) and cover for an hour or more.
I have to be honest, I’m a little skeptical of the whole GHE thing. I mean, doesn’t your scalp need to breathe? Isn’t it uncomfortable to sleep in plastic? Does adding oil to your scalp and covering it overnight clog your pores? I dunno, I’m obviously not seeing the light here. Have you tried GHE and did it work for you? Let us know your experience with it.
Simple Hair Care Regimen When Wearing Sew-In Weaves


Hi Ladies
Don’t think for a second that just
because you have a sew-in that you don’t have to take care of your hair
underneath. You would lose valuable time and growth if you make that
mistake. Having a weave provides you with many benefits, and due to low
manipulation it allows your hair to thrive and grow at what seems like warp
speed. It’s not that you hair really does grow faster when you have a
weave installed, it’s just that you can retain the majority of your length if
you go about it correctly. I will walk you through the steps I take to
make sure my weave stays looking great while keeping my hair intact.
Protein
As it turns out, you should do a
protein treatment on your wash day. When I get a sew-in, I use Aphogee
Intensive Two Minute Keratin Reconstructor or Organic Root Stimulator Olive Oil
Replenishing Conditioner . I usually keep my weave installed for two
months. I tend to use the protein treatment once every two weeks.
This brand of protein treatment is usually meant for permed/relaxed hair, but
it works on natural hair as well, especially if it will be immobilized for an
extended period of time. It keeps my hair strong and I do not experience
breakage or a massive amount of shedding.
Deep
Conditioning
Even
without a weave, you must never skip this step. Conditioners that are
very thin in nature work best when you condition your hair under a weave.
Just think, you have a head full of added hair on your head and you have to get
through that before you can even get to your own hair, which is braided
tightly. The goal is to make sure that every strand of hair from the root
to the tip gets the benefit of the conditioner. Thick conditioners will
just sit on the top layer of your braided hair. Sometimes a stylist will
braid extra hair in with your own hair, making it even more pertinent that you
have a conditioner with a very thin, almost watery consistency to be able to
move through the bulk to your scalp. VO5 Moisture Milk is an excellent
conditioner that will be able to penetrate through the hair and down to your
scalp. .
Daily
Moisture
If you are wearing hair that is not
wet and wavy and you wish to keep it dry, you must use a moisturizer that will
not wet your hair, but still get the job done. African Pride Braid Spray
is one such product that will not make your hair wet, but it will give it a
mist, thus providing the daily moisture you need. You can use any brand
of braid spray that you prefer, but make sure it has a nozzle or a spray
mechanism. In other words, you do not want a moisturizer that you have to
pour into your hand, this will make it harder for you to get down to your hair
and get an even coverage. For my daily moisture directly on my hair I use
Lusters Scurl no drip activator moisturizer. I just spray it directly onto my
hair by the weave tracks.
Dealing
with Weave
As far as keeping the style of your
weave and keeping it fresh looking, I just want to say that you do not have to
compromise the look of your weave while taking care of your hair. You can
still practice healthy hair care and rock a sew-in at the same time.
Sometimes women make the mistake of thinking that if they mess with their own
hair, then they will mess the weave up. Trust me, your braids will not
come loose because you are deep conditioning. You will be able to curl
the weave again and style it back daily. You probably tie it up, wrap or
bun it at night anyway. Go ahead and make good use of your time, by
growing your own hair longer while you have your weave. If you have wet
and wavy hair installed, make sure that there is a protein balance since you
will be wetting your hair often. When I had wet and wavy hair in, I
braided the hair and tied it up to sleep. Having a weave is a very simple
and easy style, but it is also easy to miss steps, and that could be at a
detriment to your own hair.
Tips
- After the stylist braids you hair, look in the mirror
to see the pattern. Once the hair is sewn in, you will not be able to
see your scalp that well. If you know the pattern that your hair was
braided in, this will help you with moisturizing or if you wanted to oil
your scalp directly.
- A protein treatment should be done once every two
weeks. I like to do my protein treatment before I wash, but you can
do it after you wash if your wish. When I do my protein treatment on
dry hair, it just seems to make my hair that much stronger versus when I
do them on wet hair. Either way, do not skip this step!
- Deep condition using saran wrap and a plastic cap under
a dryer. I put my conditioner on, making sure it is through my braided
hair and scalp and I carefully massage to ensure proper
distribution. I take a sheet of saran wrap and wrap my hair
up. Then I put a plastic cap on over the saran wrap. I sit
under the dryer for an hour. We all know the shower cap provides a
level of occlusion, but by the saran wrap being snug and tight to the
scalp it traps the moisture in even more. Both your own hair and
your weave should feel fabulous after this process.
- Wash the conditioner out and sit under your dryer until
your braids are dry. Check under your braids to make sure that deep
within the braid is dry and not just the top layer of your hair.
- Spray your leave in conditioner on your hair under the
weave and your braid spray on your braids to moisturize. Spray your styling
product on your weave and Style as usual.
|
Products Required
Washing Your Weave
Do not pile the hair on top of your head when washing and try
to use cool water. If the weave is long dividing it into 2 – 8 plaits prior
to washing can help to minimise the tangle factor! When running
the water over your weave make sure the water pressure is low.
Washing Your hair
Concentrate
on cleaning your scalp/cornrows. Be gentle,press in shampoo/conditioner and
rub don’t scrub.make sure the water pressure is low when rinsing, you
don't want to loosen your cornrows.
Washing your hair under weave
Drying –Very important!
Your
cornrows underneath your braids must be dry before you sleep on them, or your
hair can mildew and smell!
Follow
manufactures advice for styling.
Happy Hair growing
Curly......
|
My regimen is very simple and i try and stick to it,
i also take my vitamin supplements daily. Here it is explained below
MY
WEEKLY REGIMEN
**I pre-poo with coconut milk EVOO honey and conditioner
**Shampoo with ORS Olive Oil Creamy Aloe Shampoo.
**Co-Wash with Tresseme nourishing moisture conditioner weekly.
**Deep Condition with EVOO, elasta qp dpr-11+ deep penetrating remoisturizing Conditioner/ORS Replenishing conditioner.i apply and for 45 mins-1 hour with no heat or deep condition overnight**
**Once
every 6 weeks do a protein treatment with ORS Hair Mayonnaise
**After each wash I spray my hair with Scurl no drip curl activator and use Cantu Shea butter leave in conditioning repair cream as a leave in.
**After each wash I spray my hair with Scurl no drip curl activator and use Cantu Shea butter leave in conditioning repair cream as a leave in.
**I apply
castor oil or JBCO to my ends/edges/and nape after each wash.**
***I moisturize and seal nightly with Elasta QP Olive Oil and mango butter and seal with Castor oil or EVOO and apply JBCO or Doo Grow mega thick oil to my scalp 4-5 times a week.**
**also once or twice a week I use the GHE
method.*****I moisturize and seal nightly with Elasta QP Olive Oil and mango butter and seal with Castor oil or EVOO and apply JBCO or Doo Grow mega thick oil to my scalp 4-5 times a week.**
I am sure i will update as i continue on my journey
This are the results of how my regimen has worked for me so far March 2013 to July 2013 Progress.
  | |||
Hair Length
Starting Length
Armpit Length (APL) -
Bra Strap Length (BSL)
Mid Back Length
Hi, y'all
Ladies lets talk about hair lengths and understand the time frames it takes to grow our hair obviously when trying our level best to take care of our tresses.
HAIR LENGTH CHART
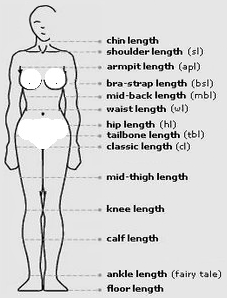
How long is your Hair? Find the right words for your length!
We all refer to the lengths of hair in very general terms as “short”, “medium long”, “shoulder length” or "long". But do these words really convey the message? There are often misunderstandings when someone describes the different hair lengths to another person and when this happens at the salon, the consequences could be rather unpleasant.
To avoid any further confusion about hair lengths and their definition,Here is a very handy hair length chart to show us the most common lengths and all of the in-betweens. It is easy to remember since the lengths are measured at the level of body parts from ear to ankle. Find out what you current hair length is and which one you would like to have.It also tell you how long it takes to grow the hair from one line to the next, based on an average height woman with an average hair growth rate of 0.5 inches a month.
The Short Lengths:
Ear Length is the shortest level of hair and, as the name implies, it reaches the ears. This could be the earlobe or even the top of the ear. If you are asking for a haircut this short, your stylist will get a clear idea of how daring you want to be.
Chin length is one of the classics and many of the most stylish looks have it. Just think of all of the cute bobs or retro looks with a 1930's flavor. Chin length also looks great with textured and layered short haircuts.
The Medium Lengths:
Between short and long the medium lengths are a great way to get volume in your hair and also just enough to create stylish up dos.
Neck length is most flattering for most face shapes. The cutting line is between chin and shoulder length. It is often used for wispy shag looks that have layers, longer bobs and it is also fun for curly hair.
Shoulder length is a nice compromise for those who want the feel of longer hair, without all the weight. This length can be tied to ponytails, chignons and all kinds of pretty up dos and also looks super stylish when just worn straight down.
Long Hair:
Anything below shoulder length is considered to be long hair. And how many steps of it there are! Keep reading to find your ideal cutting line.
Collarbone length is just below the shoulder line and gives the hair an extra couple of inches of movement. At this length you can consider braiding the hair and it is also great for long layers with finely textured tips.
Armpit length is when things gets serious in terms of a true mane. Add some layers and perhaps waves for more volume and drama and you'll have a very sexy and alluring look.
Bra Strap length sits right where it says in the name, a few inches below the armpit, at about the height of your shoulder blades. To grow your hair to this length, starting with a chin length look would take about 20 months considering the average hair growth of 0.5 inch per month. For more growing times and to do your own math, please check below.
Mid Back length will take about 6 months longer and then the hair will have a great length for beautiful braids and just for letting it flow in the wind.
Hair that grows to waist length often turns heads and this is when the length really begins to get attention. From here on, the longer the hair is, the more rare it is and the more wows you will hear.
Even longer hair:
Between hip and calf length, there is the tailbone length and then the classic length, which is not named after a body part. This classic length reaches just past the buttocks to the very upper thigh. After this there is the mid-thigh length, the knee, the calf and finally the more than rare ankle length, the latter you may also call the full body coat.
This will help you to do your own math: Ear to chin = 6 months
Chin to neck = 3 – 4 months
Neck to shoulder = 3 – 4 months
Shoulder to collarbone = 4 months
Collarbone to bra straps = 12 months
Bra straps to mid-back = 6 months
Mid back to waist = 8 months
Waist to Hip = 9 months
Hip to Tailbone = 5 months
Tailbone to classic = 6 months
Classic to mid-thigh = 6 months
Mid-thigh to knee = 10 months
Knee to calf = 12 months
Calf to ankle = 15 months
Keep in mind that these measurement are average based on a woman of 5 feet 7 inches height and the growth rate of 0.5 inches per month. It shows that patience is key when it comes to hair growth. When short hair grows out it appears to grow much faster than it does in the longer stages, like between the collarbone and mid-back. However it is an optical illusion and every quarter inch is just more visible when the length of the hair is still around the face. The rate of growth is the same per month for short and for very long hair. You can give your hair a better chance to make it to a beautiful long length, by keeping it well nourished and supple to avoid breakage on its path.
The descriptions of hair lengths can be very biased depending on who is talking. A woman with long hair, that let's say reaches her waist or hip, would surely consider anything above the shoulder to be very short hair, while a fan of pixie cuts might experience a chin length bob as way long. So, don't be shy to ask for verification and specifics of which length they really mean, when you hear the very ambivalent descriptions.
To summarize it all, we call hair short, when it is shorter than chin length. Medium length is between shoulder and chin and long hair is everything below the shoulder.
Happy growing!

very nice and interesting!, thanks for your sharing! it is beautiful! Check out my weblog Hair transplant in Pakistan
ReplyDeleteThanks Rachel will definately check it out
ReplyDeleteI like your regimen its really simple and your products are very nice. Do you get better growth when you do the GHE?
ReplyDeletethanks Eva, i love the information on the Thin Edges Honey Pre-Shampoo Recipe. its great
ReplyDeleteyou are welcome PAT thanks
ReplyDeletenice job
ReplyDeleteHair Transplant In Lahore